


You've just launched a campaign, and the bounce notifications are already arriving. A few messages mention an RBL, others say “Service unavailable; Client host blocked,” and inbox placement has dropped without any obvious change to the copy. Before rewriting the campaign or adjusting warm-up settings, run an MX record blacklist check.
The check answers a narrow but important question: are the mail-server IPs associated with your domain currently listed in public DNS-based blacklists? It isn't a complete deliverability verdict, but a listed IP can cause a receiving mail transfer agent to reject a message before authentication, content, or engagement signals can help. The practical workflow is simple in principle, resolve MX records, convert each target to an IP address, query DNSBLs, interpret the responses, and then investigate the cause.
Why an MX Record Blacklist Check Is the First Thing to Run
The failure usually appears at the worst possible time. A marketer sees a sudden fall in delivered messages, a sales team reports that sequences are bouncing, or a customer says a transactional email never arrived. The SMTP response may contain a code such as 554 or wording like “Service unavailable; Client host blocked,” but the message rarely explains the whole operational story.
Behind that response, the receiving server may have checked the connecting IP against a DNS-based blacklist. If the IP appears on a list the recipient's provider trusts, the receiving mail transfer agent can reject the connection with a 5xx response. The message never reaches the stage where SPF, DKIM, content quality, or recipient engagement could influence the outcome.
Practical rule: Check whether a mail-server IP is blocked before spending time tuning subject lines or changing send volume.
An MX record blacklist check starts with the infrastructure responsible for receiving mail for the domain. A domain can publish multiple MX hosts, and each hostname can resolve to one or more IP addresses. MXToolbox describes a workflow that checks each MX record's IP against 105 DNS-based blacklists, while its domain tools page describes coverage across 100+ blacklist sources (MXToolbox). That breadth matters because one MX host can be clear while another produces a listing.
The diagnostic order that saves time
When a bounce points toward an RBL, I use this order:
- Confirm the affected path. Determine whether the rejected message came from your own SMTP infrastructure, a hosted provider, or a shared sending platform.
- Resolve every MX target. Don't test only the domain label. Identify every mail hostname and its resolved IP address.
- Query multiple DNSBLs. A single clean result can be misleading if another list has a relevant entry.
- Record the listing reason. A policy listing, an open relay finding, and a spam-source listing require different responses.
- Re-test after remediation. Delisting and DNS changes don't always appear everywhere at the same moment.
For a broader inbox diagnosis after the blacklist check, use an email deliverability tester for teams. The distinction is important: the MX record blacklist check identifies a possible infrastructure block, while a deliverability test examines the wider path toward the inbox.
Resolving MX Records and Pulling the Right Mail Server IPs
DNSBL queries normally target IP addresses, not the visible domain name. That means the first technical task is mapping the domain's MX records to the actual hosts and then mapping those hosts to addresses.
Start with a direct MX lookup:
dig MX domain.com +short
A typical response looks like this:
10 mail.domain.com.
The number is the MX priority. Lower values are preferred when several servers are available. The hostname after it is the target that must be resolved next.
You can perform the same check with:
nslookup -type=mx domain.com
The equivalent hostname lookup is:
dig A mail.domain.com +short
or:
nslookup -type=a mail.domain.com
The output gives you the IPv4 address or addresses to test. If the host also publishes IPv6, check its AAAA record separately. Some DNSBLs don't index IPv6 in the same way as IPv4, so an apparently clear IPv4 result doesn't automatically describe the IPv6 path.
What to check when the target isn't yours
An MX record may point to Google, Proofpoint, or another hosted email provider. In that situation, the MX host belongs to the provider, not to your company. You should confirm the provider's documentation and support process before treating a listing as a defect you can remediate directly.
CNAME chains create another common source of confusion. Follow the chain until you reach the address records, and preserve the relationship between each MX hostname and its resolved IP. Don't collapse several targets into one domain-level status, because each host can have a different result.
A practical check mail exchange records tool can help verify the public DNS view, but command-line lookups remain useful because they show exactly what a resolver returns at the time of testing. Repeat the lookup from more than one network when the result affects production decisions. Cached DNS data, provider-specific resolvers, and recent infrastructure changes can produce different observations.
Querying DNSBLs and Reading the Results
Once you've collected the resolved MX IPs, query each address against a selected DNSBL set. DNSBLs use reverse-octet notation. For an example address written as 1.2.3.4, the query reverses the octets before appending the blacklist zone:
dig +short 1.2.3.4.zen.spamhaus.org
dig +short 1.2.3.4.b.barracudacentral.org
dig +short 1.2.3.4.dnsbl.sorbs.net
The response tells you whether that list has a record for the IP. A clear result commonly appears as NXDOMAIN or an empty answer. A listed result returns an address in the 127.0.0.0/8 range, with the final code identifying the listing category for that DNSBL.
For Spamhaus, the commonly interpreted examples are:
127.0.0.2, listed on the Spamhaus SBL127.0.0.9, listed on the SBL CSS127.0.0.10, listed on the PBL
The code is only the starting point. Open the DNSBL's own lookup page and read the current explanation. Record the exact zone, IP, category, and timestamp rather than copying only “LISTED” into a ticket.
Common DNSBL response codes and what they mean
| IP Reversed + Zone | Response Code | Meaning |
|---|---|---|
1.2.3.4.zen.spamhaus.org | 127.0.0.2 | Listed on Spamhaus SBL |
1.2.3.4.zen.spamhaus.org | 127.0.0.9 | Listed on SBL CSS |
1.2.3.4.zen.spamhaus.org | 127.0.0.10 | Listed on PBL |
1.2.3.4.zen.spamhaus.org | NXDOMAIN or empty answer | No listing returned by that query |
1.2.3.4.b.barracudacentral.org | NXDOMAIN or empty answer | No listing returned by that query |
1.2.3.4.dnsbl.sorbs.net | NXDOMAIN or empty answer | No listing returned by that query |
A spam-source classification deserves immediate attention for outbound mail because it can indicate abuse from the sending infrastructure. An open relay finding points to a server configuration problem. A poor reputation category may reflect historical behavior, shared hosting, or signals that aren't obvious from the current campaign.
Don't treat every hit as equally important. Several low-impact listings from one provider can mean something very different from a single listing on a DNSBL that a major mailbox provider actively consults. For a consolidated lookup, you can check IP blacklist with BillionVerify, then validate serious findings against the relevant list's own explanation and removal policy.
Why a Clean Blacklist Result Can Still Mean Poor Deliverability
A clean DNSBL result proves only that the queried public lists didn't return a listing for the tested IP. It doesn't prove that a mailbox provider trusts the sender, that authentication aligns, or that recipients want the messages.
Inbox placement is better understood as several layers evaluated together:
- IP reputation reflects sending history, complaint patterns, and changes in volume.
- Domain reputation connects the From domain with the infrastructure and behavior associated with it.
- Authentication covers SPF, DKIM, and DMARC authentication and alignment.
- Provider-specific filtering applies each mailbox provider's internal reputation, content, and engagement models.
A DNSBL answer is close to binary, listed or clear. Inbox placement is a weighted decision built from many signals, so the two outcomes can diverge sharply.
A realistic clean-but-filtered scenario
Suppose the MX IP is clear on the public DNSBLs. Gmail may still place the campaign in spam if the sender's IP reputation has weakened, complaint activity has risen, or the domain's sending pattern looks inconsistent. A DKIM signature can also be technically valid while failing the alignment relationship that DMARC evaluates. For example, the message might use a relaxed header configuration while the visible From domain differs from the domain in the DKIM d= value. The signature passes cryptographic verification, but the identity relationship can still fail alignment.
That's why a clean blacklist result should trigger the next checks, not close the incident. Review authentication reports, provider-specific reputation data, bounce classifications, complaint signals, and recipient engagement. For broader operational guidance on reducing malicious messages and strengthening email controls, these IT Cloud Global phishing prevention tips provide useful security context.
A separate BillionVerify IP reputation checker can sit alongside DNSBL testing when you need to distinguish public list status from broader IP reputation. BillionVerify is a professional email verification service built to solve one problem: bad email data costs businesses money.
The following video gives additional context on how reputation and filtering affect delivery:
Triage and Remediation When an MX IP Is Listed
A listing is an incident, not a diagnosis. Start by preserving evidence before changing DNS or requesting removal. Capture the tested IP, the exact DNSBL zone, the returned code, the listed reason, and the time of the query.
The remediation sequence
- Identify the responsible list. Open the DNSBL's lookup page and verify that the result is current. Check whether the entry applies to a sending IP, an inbound MX host, a range, or a policy category.
- Read the removal policy. Spamhaus, Barracuda, and SORBS don't use identical procedures. Some entries clear after the underlying behavior stops, while others require an explicit request or a provider-managed process.
- Fix the cause first. Check reverse DNS and make sure the IP has an appropriate PTR. Tighten SPF so it authorizes only current sending sources. Rotate DKIM keys if you suspect compromise, and inspect recent campaigns for spam-trap or invalid-recipient activity.
- Document the correction. Save the relevant PTR, SPF, and DKIM lookup outputs, server changes, account-security actions, and list-cleaning records.
- Submit the request when eligible. Use the DNSBL's official portal, provide concise evidence, and avoid repeated submissions that don't address the cause.
- Re-query after the applicable cooldown. Confirm a clear response before returning to normal volume. Delisting can propagate asynchronously, so test more than once when the business impact is high.
Do not request removal while the abuse is still active. A listing that returns after delisting usually creates a harder operational problem than the original event.
Common listing causes and required fixes
| Listing Signal | Root Cause | Remediation Action |
|---|---|---|
| Spam-source listing | Compromised account, infected host, or abusive campaign | Stop the source, secure accounts, inspect logs, and suspend affected sending |
| Open relay finding | Server accepts unauthorized third-party relay | Disable open relay behavior and restrict SMTP relay permissions |
| Poor reputation category | Complaints, weak list hygiene, or unstable volume | Remove risky recipients, review consent, and stabilize sending behavior |
| Policy or residential-range listing | IP use conflicts with the list's policy | Move mail to an appropriate provider or request review where supported |
| Repeated listing after removal | Root cause wasn't fully corrected | Re-audit infrastructure, authentication, access controls, and recent recipients |
If the MX record points to a hosted provider, send the evidence to that provider instead of altering infrastructure you don't control. Your team should still document the incident and monitor the provider's status, because a shared or outsourced mail path can affect several domains at once.
Comparing Tools and Scripts for MX Record Blacklist Checks
The right tool depends on whether you're investigating one incident or maintaining a repeatable control. A web interface is fast for a marketer handling a single bounce, while a command-line loop is more useful when infrastructure changes need to trigger an automated test.
MXToolbox SuperTool offers a convenient web workflow for ad-hoc diagnostics and can check a broad set of DNSBL sources. MultiRBL is useful when you need broad free coverage and want to submit multiple IPs. Spamhaus's own checker is important when the result involves Spamhaus zones, because its explanation and policy are the authoritative reference for those entries.
MXToolbox Blacklist Monitor is suited to teams that want alerting across monitored MX hosts rather than a manual lookup. A Bash workflow gives you the most control. Resolve the MX targets, resolve their address records, loop through a curated DNSBL list, and treat NXDOMAIN as clear while recording an A-record response as a possible listing. In CI or cron, that output can create a ticket without requiring someone to remember the check.
MX record blacklist check tools compared
| Tool | Coverage | Automation Fit | Best For |
|---|---|---|---|
| MXToolbox SuperTool | Broad web-based DNSBL diagnostics | Low, primarily interactive | One-off investigations |
| MultiRBL.valli.org | Broad free blacklist coverage | Moderate, useful for batch input | Sweeping multiple MX IPs |
| Spamhaus Blocklist Checker | Spamhaus zones and listing explanations | Moderate, policy-specific | Transactional senders and serious hits |
| MXToolbox Blacklist Monitor | Monitoring across configured MX hosts | High through alerting | Ongoing status awareness |
Bash and dig loop | Curated list chosen by your team | High, suitable for cron and CI | Headless recurring checks |
Coverage breadth isn't the only trade-off. A large list can produce noise, while a curated list can miss a provider-specific signal. Alert latency also matters, as does whether your team can act on an alert outside business hours. For list hygiene and verification-tool selection, consult BillionVerify's list of verification tools as a separate input, not as a substitute for infrastructure monitoring.
Building a Repeatable Monitoring and Verification Workflow
A one-off lookup finds today's problem. A runbook prevents the same problem from waiting until the next campaign.
Run a weekly DNSBL sweep against every resolved MX IP. Run a daily SPF, DKIM, and DMARC alignment test, because authentication can break after a provider, CRM, or automation change. Perform a monthly reverse-DNS audit to catch stale PTR records, decommissioned hosts, or infrastructure ownership changes.
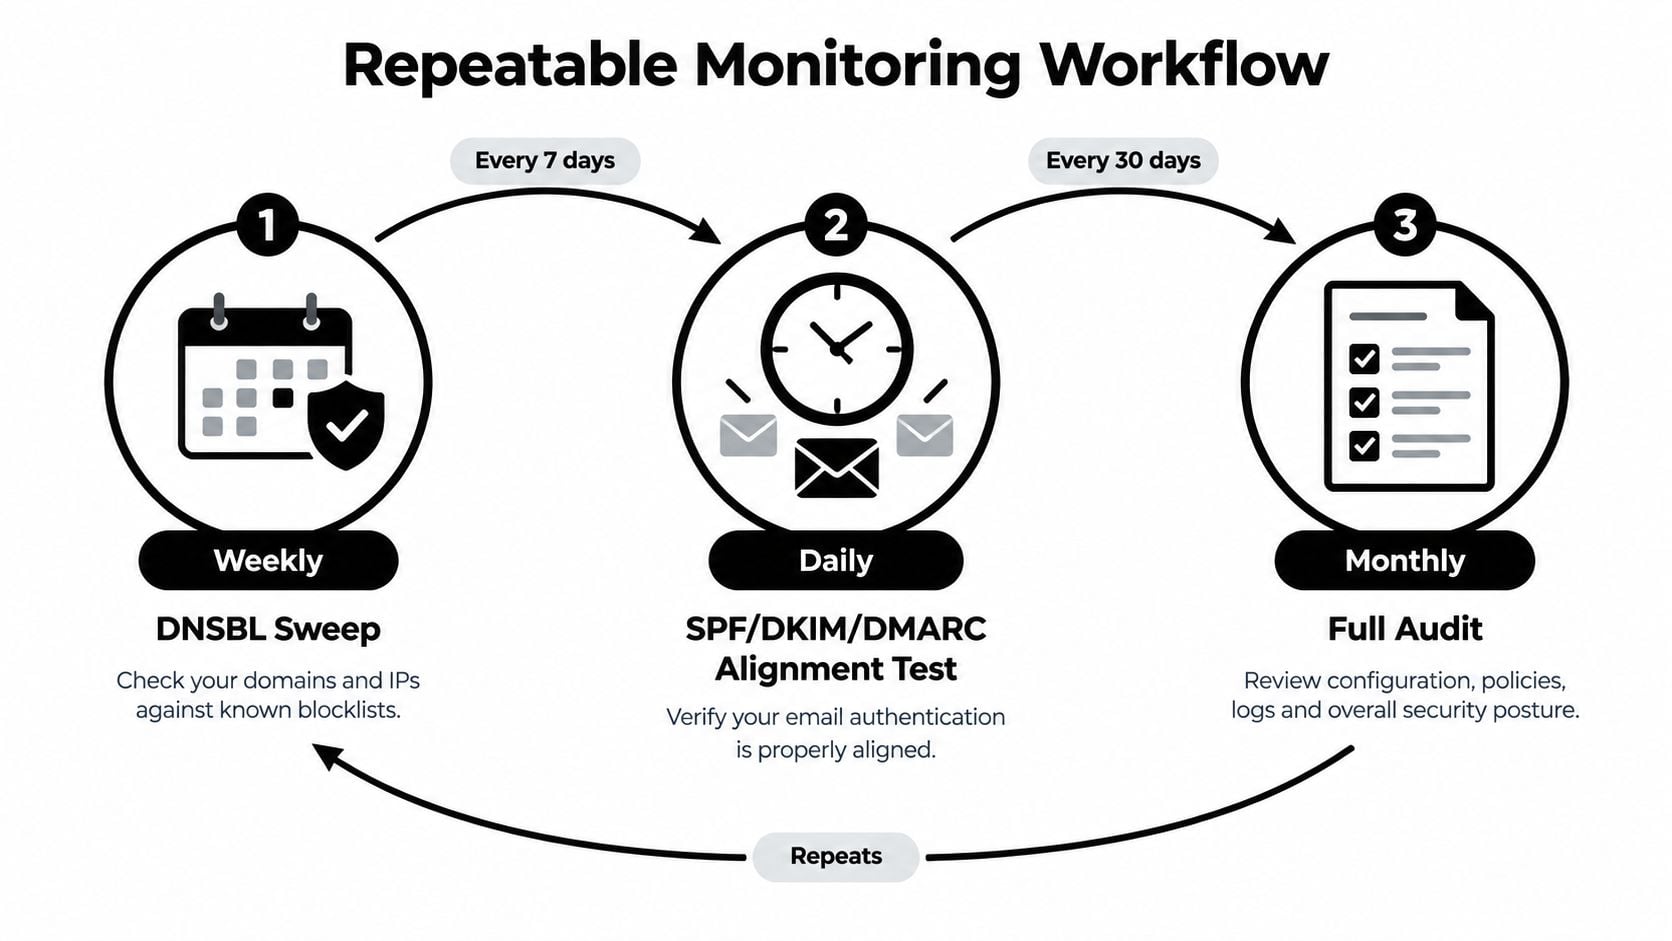
Set clear escalation rules. A single confirmed listing should page the on-call deliverability owner. A 5% drop in inbox placement should trigger a deeper reputation review, including authentication alignment, complaint signals, content changes, and provider-specific data.
The same monitoring pipeline should also protect list quality. When bounce addresses or unverified contacts appear, hand them to an email verification process before the next send. MX checks establish whether a domain is configured to receive email, but they don't prove that a specific mailbox exists. Verification workflows commonly combine MX lookup, SMTP probing, and catch-all handling because a catch-all server accepts mail for any local part, making basic SMTP probing unable to distinguish a real mailbox from a fabricated one (Prospeo). If no MX record exists, the domain generally isn't configured to receive email, so addresses at that domain are likely to bounce (Marketing Tech News).
A concise Monday runbook is: resolve MX, query each DNSBL, review authentication, verify bounce addresses, and log the results with timestamps. That order keeps mail-server health and recipient-data hygiene in the same operational loop without confusing one diagnostic with another.
BillionVerify combines email verification for single checks, bulk list cleaning, and real-time API workflows, helping teams identify risky addresses before they damage sender reputation. Use the results alongside your MX and DNSBL monitoring, then visit BillionVerify to evaluate how it fits your campaign, CRM, or signup-verification process.